|
|
| Post Number: 1
|
allgames71 

Group: Members
Posts: 299
Joined: Nov. 2008
|
 |
Posted on: Sep. 19 2010,16:51 |
|
   |
I have Penguin gif pictures on USB Main Bootmenu, but how can I put a picture in USB submenu.
Thank you
|
 |
|
|
| Post Number: 2
|
balder 

Group: Members
Posts: 1942
Joined: Oct. 2008
|
 |
Posted on: Sep. 19 2010,18:17 |
|
    |
@allgames71
Quote: ”how can I put a picture in USB submenu”
First you need a background picture.
Picture must be an ***.xpm-picture (you need “Gimp” to create your own background)
Some info HERE
Â
Note: grub support compressed files (wallpaper) ***.xpm.gz
Change your “sub-menu.lst”
To something like this there “boot.gfx.gz” is the background wallpaper:
default 0
timeout 10
gfxmenu = /boot.gfx.gz
Regards balder
Edited by balder on Sep. 19 2010,18:18
--------------
Download complete set of scripts including help file HERE
Note: Script collection updated 2019-05-19. Scripts mainly support EasyBoot_6.5 or later
|
 |
|
|
| Post Number: 3
|
allgames71 

Group: Members
Posts: 299
Joined: Nov. 2008
|
 |
Posted on: Sep. 20 2010,13:13 |
|
    |
hello balder,
Thanks for your instruction. I think there's a lot for me to learn in .GFX
May be I'll reply you later, thanks in advance.
|
 |
|
|
| Post Number: 4
|
allgames71 

Group: Members
Posts: 299
Joined: Nov. 2008
|
 |
Posted on: Sep. 24 2010,08:22 |
|
    |
hello balder,
I've failed in making submenu background pictures.
I tried it these way :
1. Uncompress your Wallpaper\BOOT.GFX.gz. Drag it to the GFX_Menu-tray to become a BOOT_Files folder with jpg pictures. I replace your pback.jpg with my jpg file. Then drag this folder to GFX_Menu-tray again to become BOOT.GFX, then compress it with winrar and name it to test.gfx.gz. I palce this test.gfx.gz file to Wallpaper\test.gfx.gz.
one of my submenu is like this :
-----------------------------------------------------------------------
default 0
gfxmenu = /wallpaper/test.gfx.gz
title RXPE999
find --set-root --ignore-floppies /iso/rxpe.iso
map /iso/rxpe.iso (hd32)
map --hook
chainloader (hd32)
boot
title Acronis FULL Rescue Media 2010
find --set-root --ignore-floppies /iso/acron2010.iso
map /iso/acron2010.iso (hd32)
map --hook
chainloader (hd32)
boot
title Win7PE (Windows 7) , Win7PE (BSExplorer)
find --set-root /7PE.lst
configfile /7PE.lst
title Redo Backup & Recovery
find --set-root --ignore-floppies /iso/redo.iso
map /iso/redo.iso (hd32)
map --hook
chainloader (hd32)
boot
title Easeus Disk Copy 2.3
find --set-root --ignore-floppies /iso/edc.iso
map /iso/edc.iso (hd32)
map --hook
chainloader (hd32)
boot
title CopyWipe
find --set-root --ignore-floppies /iso/wipe.iso
map /iso/wipe.iso (hd32)
map --hook
chainloader (hd32)
boot
title Back to Main Menu
find --set-root /menu.lst
configfile /menu.lst
----------------------------------------------------------------------
2. I use GIMP to make a back.xpm photo and use winrar to compress it and named to back.xpm.gz, then place it in Wallpaper\back.xpm.gz
-----------------------------------------------------------------------
default 0
gfxmenu = /wallpaper/back.xpm.gz
title RXPE999
find --set-root --ignore-floppies /iso/rxpe.iso
map /iso/rxpe.iso (hd32)
map --hook
chainloader (hd32)
boot
-----------------------------------------------------------------------
Both the above 2 ways fail to load background picture and only can see the plain text menu.
Balder, can you please tell me how to make the USB submenu background picture step by step. Thanks.
|
 |
|
|
| Post Number: 5
|
balder 

Group: Members
Posts: 1942
Joined: Oct. 2008
|
 |
Posted on: Sep. 24 2010,14:41 |
|
    |
@allgames71
Sorry I misunderstood you a bit 
I thought your intention was to use “gfxmenu” when you only want a background picture 
To use a background picture you instead set “splashimage”
In your case it should be like this: splashimage /wallpaper/test.gfx.gz
Notice difference to “gfxmenu = /wallpaper/boot.gfx.gz”
Test and see if this works okay 
Regards balder
--------------
Download complete set of scripts including help file HERE
Note: Script collection updated 2019-05-19. Scripts mainly support EasyBoot_6.5 or later
|
 |
|
|
| Post Number: 6
|
allgames71 

Group: Members
Posts: 299
Joined: Nov. 2008
|
 |
Posted on: Sep. 24 2010,15:43 |
|
    |
hello balder,
quote : "Sorry I misunderstood you a bit"
My question is simple :
How can I put a normal picture in USB submenu as a background picture.
I've tried "splashimage /wallpaper/test.gfx.gz" , it doesn't work, instead when choose this submenu , all the screen black with a tiny white cursor blanking all over and nothing comes out.
Actually what format of picture should I create for it ? jpg, gifm, bmp, xpm or compressed xpm.gz ? After create this picture, how should I put in the submenu.lst ? Say "splashimage /wallpaper/test.bmp", would it be ok ?
Thanks in advance.
|
 |
|
|
| Post Number: 7
|
balder 

Group: Members
Posts: 1942
Joined: Oct. 2008
|
 |
Posted on: Sep. 25 2010,03:53 |
|
    |
@allgames71
Quote: ”Actually what format of picture should I create for it ? jpg, gifm, bmp, xpm or compressed xpm.gz ?”
You can use any jpg, gif, bmp , png etcetera as input but you need a program that is able to manipulate image to the right 14-bit image (yes it’s mostly a 14-bit image not 8-bit or 16-bit etcetera as used in Windows) – try to use “gimp”.
Quote: “how should I put in the submenu.lst ? Say "splashimage /wallpaper/test.bmp", would it be ok ?”
Sure that should work just fine
Please read HERE  Â Â
Regards balder
--------------
Download complete set of scripts including help file HERE
Note: Script collection updated 2019-05-19. Scripts mainly support EasyBoot_6.5 or later
|
 |
|
|
| Post Number: 8
|
allgames71 

Group: Members
Posts: 299
Joined: Nov. 2008
|
 |
Posted on: Sep. 25 2010,09:31 |
|
    |
hello balder,
Thanks for your tutor. I've gone through the "Grub4dos Guide - Creating a Splash Image" page. It's tutorial is :
1. Use GIMP to make a 14 bit color image (I use .BMP) ,
it's easy. But I found that if the color changed to 14 bit coler, it's very ugly , unlike your USB mainmenu's gif Penguin background wallpaer, your color is very smooth and beautiful like 256 color at least. I'm not sure if it is 14 bit color look ugly in windows but will be smooth and beautiful in USB submenu !
2. Then use "ImageMagick tool " to convert the 14 bit color made.BMP. The command line is :
convert.exe C:\splash.bmp C:\splash.xpm.gz
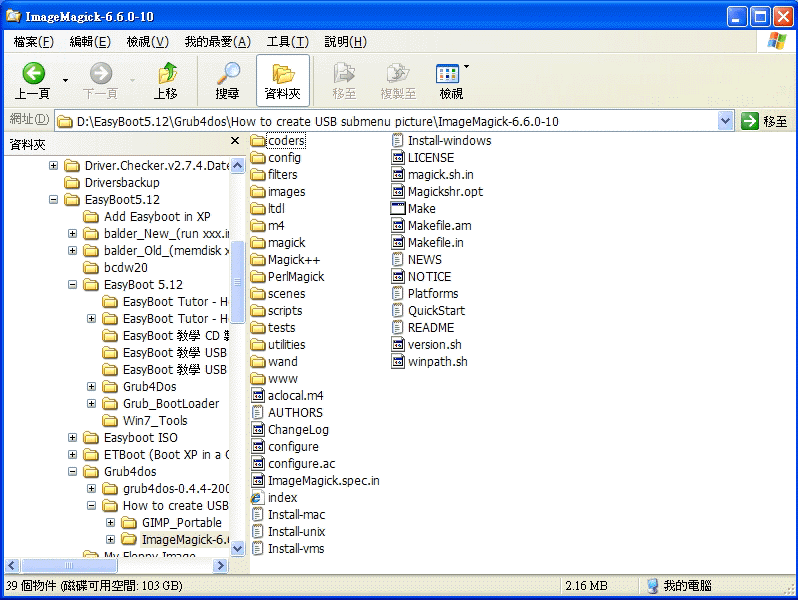
My question is , I can't find the convert.exe in "ImageMagick tool "'s folder. If there is , I can jump to command prompt and type the above command line to convert the made.BMP to made.xpm.gz . Please where exactly (which folder dir location) can I start to type the command line in command prompt ? As the "ImageMagick tool " folder structure is like this :
Attached Image

|
 |
|
|
| Post Number: 9
|
balder 

Group: Members
Posts: 1942
Joined: Oct. 2008
|
 |
Posted on: Sep. 25 2010,15:33 |
|
    |
@allgames71
Quote: ”I can't find the convert.exe in "ImageMagick tool "'s folder”
Same here 
Instruction in diddy’s grub-tutorial is here a little bit confusing
You have to download a different version of  "ImageMagick tool”- download HERE
I have created a script that automatically runs the process with convert.exe mentioned in diddy’s tutorial. – download script HERE
Extract script from zip-file to “WinBuilder_Complete\Projects\LiveXP\EasyBoot”
Restart WinBuilder.exe and you have a new script “easyboot-convert-xpm”
Note1: you still need to use Gimp and “down-converting” images to 14-bit bmp
Then run script to optimise bmp-image to a image accepted by grub.
Note2: Best result is always to create a 14-bit image from beginning and not “down-converting” from a created bmp-image that have a lot of more colours that is lost when “downgrading” to 14-bit colour.
balder
--------------
Download complete set of scripts including help file HERE
Note: Script collection updated 2019-05-19. Scripts mainly support EasyBoot_6.5 or later
|
 |
|
|
| Post Number: 10
|
allgames71 

Group: Members
Posts: 299
Joined: Nov. 2008
|
 |
Posted on: Sep. 25 2010,19:30 |
|
   |
hello balder,
Thanks very much for your tutorial, It works and easy enough. But I've a request if you don't mind.
quote : "Note2: Best result is always to create a 14-bit image from beginning and not “down-converting” from a created bmp-image that have a lot of more colours that is lost when “downgrading” to 14-bit colour."
I think you are right , as my test.xpm.gz is very ugly that I really "down-converting" it from a very nice colorful one.
I'm an Art-Blind , I don't know how to draw or paint pictures , I just download some funny pictures from some website , then take it as my USB submenu background.
I understand "Best result is always to create a 14-bit image from beginning" is important. But I really don't know how and I want to have a 14-bit nice image. Would your mind to be my teacher again. Please tell me the best way to convert a colorful nice pitcutre to 14-bit image ? Thanks in advance.
Attached Image

|
 |
|
|
|
|
|
© 2002-2024 EZB Systems, Inc.
|
|
|